Saturday, 13 April 2013

What If... Terry Bogard is Hibiki? XD (Hero Saga moment)

well there was a time when i was quite taken in with the Fatal Fury movie series due to its simpleness, cool central characters (whats more cool than a wandering penniless idiot who just want to hone his martial skills ;p *off screen Terry looks for food in the trash*). You can check it out here: Fatal Fury or here for the movie http://www.youtube.com/watch?v=9_otEXNJ8oo (only if u can understand Japanese or read French -_- i cant find an english ver of the movie >_>)
So with an abundant of Hibiki typed bodies i have, I went about to try my first crossover customs between kamen riders and king of fighters ;D

Here is Terry Bogard figure I used to base my custom on

The new things I have to experiment with was how to make hisburning knuckles effect since i love that move of his. No, i never plaed KoF but he always use that move in the movie >_>

As those who read my ealier post would know that oyumaru resin can be used to replicate effects so I plop it on to Flaming Garo's flame to make some fire molds:

Then I went about making fire sculpts using the mold

Looks nice enuf but dammit they're not translucent :(
Then i realised i used to make small transparent pieces using araldite (a form of transparent putties, see pic below).

I wasnt sure if it will work or not as araldite has this effect that is kinda sticky to the touch even upon drying. Anyway i tried it to see how it turns out. It turned out pretty not bad :D The stickyness apparently only appear on the parts that are exposed to air and not the part that sticks to the mold when it is drying, which is great as teh fire effect will be on the surface that sticks to the mold.

So here they are

They looked slightly yellow due to the araldite itself.

In the meantime while i was experimenting with araldites etc, I was remolding the Dannki body

The pigtail came from Ryutaros of Den o series. The rest are all pure hibki materials.

The translucent parts went through 3 layers of paint, 1 transparent orange, then 1 trasparent red and lastly solid yellow


And finally here is the finished product. Since he is a Terry and Hibiki crossover, i call him Kamen Rider Terryaki XD:


Pure diehard fans of kamen riders and KoF alike will hate me for this atrocity XD

Post production notes:

1) The translucent parts have one problem: Araldite produce air bubbles so it spoils the sculpt and looks funny with bubbles in it. The bubbles were produced when you mix the putty and the hardener together. This can be solved by replaing araldite with this

Due to the shape of the tube, it reduces bubble as it premix the 2 components before letting them out. Cool!!! I'll try it next time :D

2) I was attempting to make maziora color for his pants, sorta a mix of blue and purple but it came out like just blue T_T Ill need to experiment that more coz i believe it can be done :D If anyone knows how to produce maziora colors pls PLS do teach me!!

Well thats all o_o people are now asking me to make a kamen rider mix Mai Shiranui but that would be crazy ;p

Thursday, 11 April 2013

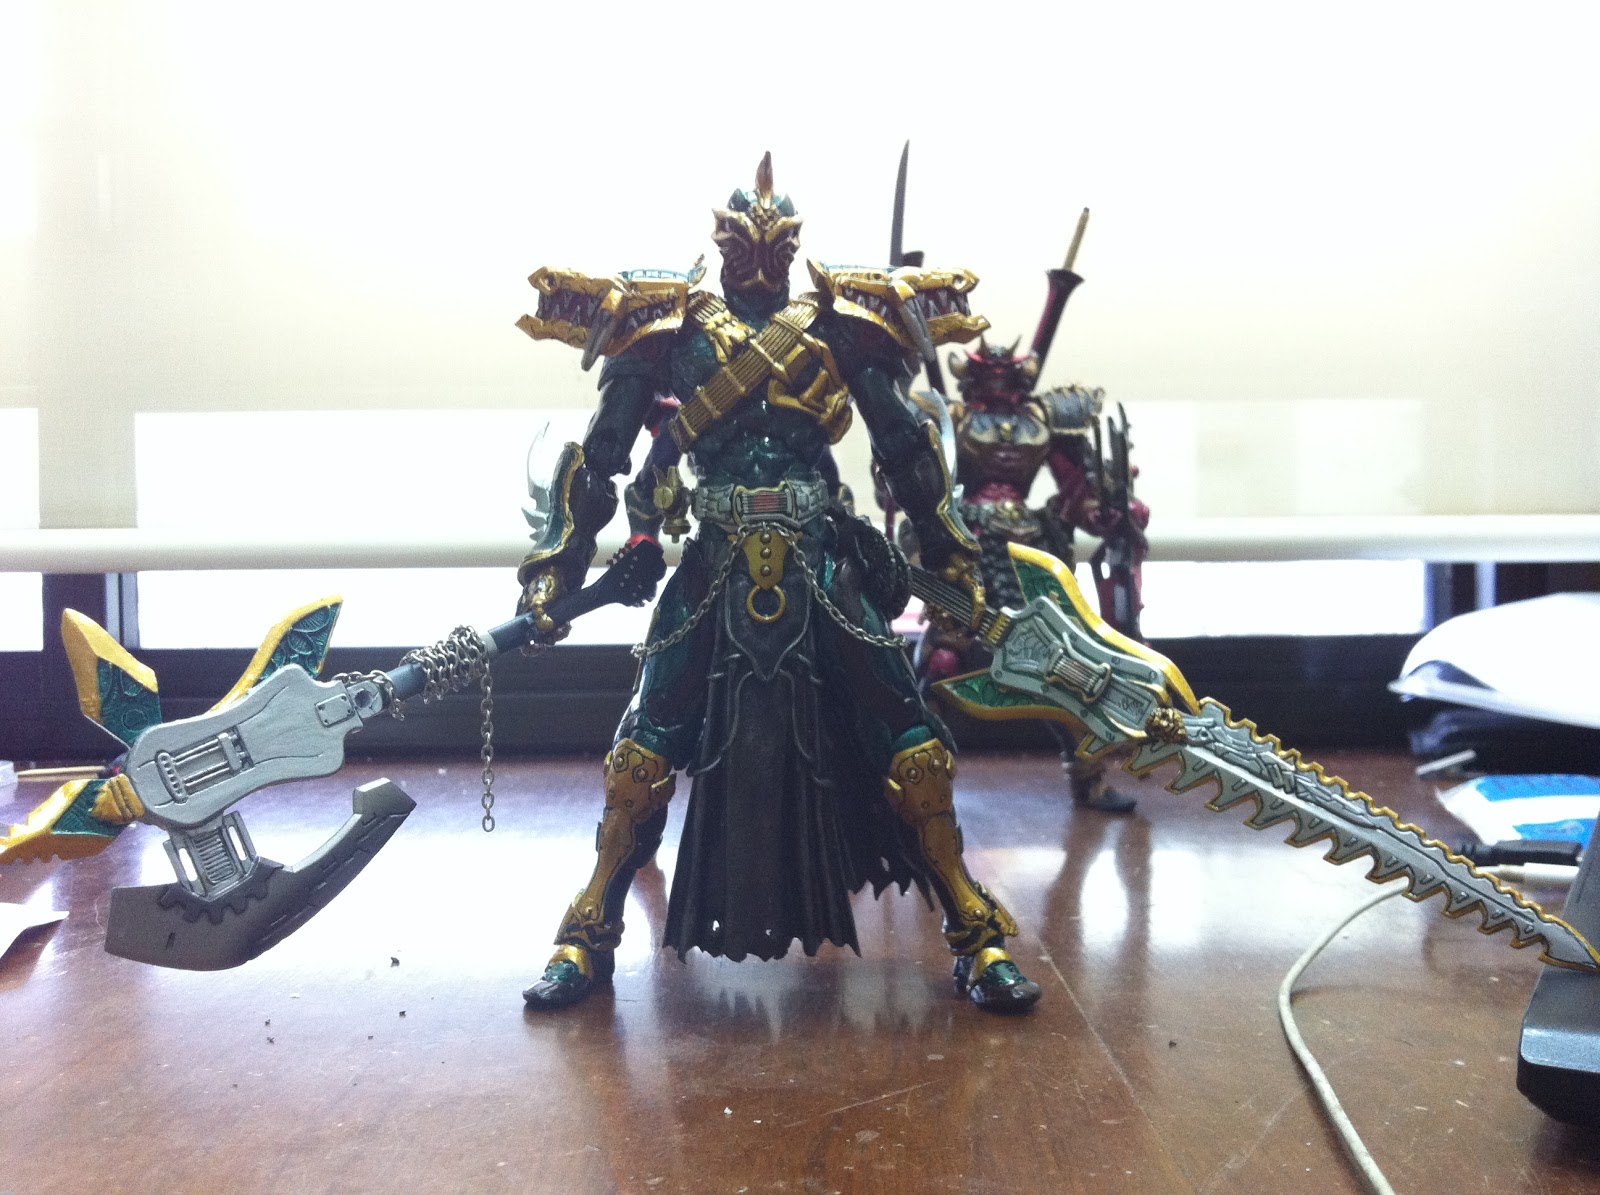
Zanki gets angry and goes to War!!

And with that tagline in mind plus after i counted the items i need to make my 2 yuukis, i realised the spare parts leftovers are very useful to make a Zanki Warring State version, a concept i had in mind for some time now together with a Ibuki Warring State custom. I usually try to make a rough sketch of the design before i go ahead with it and it looked like this:

More often than not the results comes out somewhat different ;p

What i have left from the Gaoh i used for Yuuki custom was his head, his shoulder pads and his sword piece. The general idea is to mash everything into a figure to make it look coherent and here was the initial idea:

Initial impression was it looks ok but the feeling he is holding on to a fishbone was very strong ;p Plus his body chest didnt change much. So there was again much fiddling and cutting and glue, finally finalised the weapon's concept like so:

I cut off some parts of the sword to make it shorter. I later added back some of the fins from the disposed portion to make it look more "whole". I was satisfied with the axe except that the axe piece itself looked a bit techno which doesnt suit Warring State era at all. But then, since when was there electric guitars in Japan's Warring State era anyway?!?! So, with some effort in convincing my brain that these things dont matter, I forged on to mess with the figure and it began to take shape like so:
The chest piece looks nicer now with a more barbaric look with an "x" shaped armor on it. I stuck in my spare deneb's skirt (the side of the skirts was used in yuuki customs) as well as replace his lower arms with Agito's shining arms. You can also see now where i put the left sided armored lower leg I mentioned in my earlier tutorial. His left upper leg was left too skinny so I went about to equipped it with armor putty :) added details on the shoulder pads as well. The rest I dont feel like messing with them as the figure is already quite details and beginning to look too cluttered.

Then began the tedious process of repainting the entire figure. But it was quite enjoyable as i painting green over green is easy and changing the color design from a mash of color into a coherent green gold was also nice to see how the whole color scheme emerges. I also changed his back with 2 studs sticking out to allow the sword or axe to connect to the back. The previous photo the sword was stuck to the back thanks to blue tag ;p
So the sword now looks like so:
I have also weathered the skirts to make it looks dirtier and grittier but the result came out not very satisfying as the rest of his body looks quite clean ;p I have some leftover chains from my spawn figure which was used to make Ouja Survive so i generously sprinkled them all over the figure. Finally when everything was dried, i added linings on him. Voila, another non canon kamen rider ;D

And here is the final product. Enjoy the photos :)


Here;s a comparison of the original zanki with the custom Warring State zanki :)


And with that i bid you a good weekend. Have a good rest ;)

Saturday, 6 April 2013

Finished my two Yuukis customs today and wanted to put them on one of my shelf and found I cant see the guys at the 3rd row anymore ;p


So today I pulled together some flimsy clear boxes, an empty celophan tape shell, a toy gun i swiped from my daughter, a plastic cup i used to mix color and some blue tag and push the 3rd row higher ;p The result is... still not satisfactory but it'll do coz im too cheapo to buy acrylic steps -_-... just hope they dont all come crasing down!! D:


Friday, 5 April 2013

yoo. today's a small tinee wienee tutorial about making nice hibiki typed armored lower legssss. A very long winded name of a topic indeed but the tutorial's short.

Alrite! First off, to address the right question first: Why do i need a pair of armored legs and how come i have 2 spares anyway??

For the first part of the question: everyone needs more armored legs!! Yea serious! ;p
For the 2nd part of the question: well when you get to me like me who owns 6 spare zankis for customs/sales, you tend to have some extras ;p

Alrite onward to the tutorial!

Here are 2 left legged armored piece. You cant use both of them in 1 single figure, so you change one of them to be right legged :D


First, cut off those pieces that appears only on the left hand side of the piece.

Then cut some space on the right hand side of the piece

Stick those pieces you cut from the left hand side of the piece on the right side

Now add putty over the gaps and holes plus extend the feet to make it appear to be right foot and not left.

Repaint the whole thing. I dont have a single picture of itspainted ver but the next post i will show you how it looks like and where it goes :D

Voila, now you have a pair of nice looking right and left armored legs :D

Next: To really answer the first part of the question above :D

Monday, 1 April 2013

How to fix up your broken Ryuki :D


hi!

Well for starters, I havent been writing anything on this blog since it was set up ;p  and still can't at the moment so I thought Ill just post a simple tutorial on how to fix ryuki's broken joint.

As SIC collectors will be familiar with this issue, Ryuki series bodies have incredbly fragile joints at the knees and elbows.

I bought a SIC Ryuki complete but both his elbow joints and his right knee joint are broken. Worse is the fact that the original seller glued both his elbow joints fixed in a position!!

Lets talk about the materials you need to fix the joints. You will need a nice blade (get it in any stationery shops), epoxy putty or what is known as bondite where i come from (from hardware shop), revoltech joints 8mm (get it from sites like amiami or hlj), a handdrill, paint (I use Mr Color red and black mix to get Ryuki's color), some toothpicks and a bottle of nail polish ;p

ok so here's how the ryuki looks like originally with the broken and glued joint:

Here are the steps to do the repairs:
1) Cut and pull out all the glued joints but becareful when you do that, you dont want to pull out the wrong parts and break them further. Do cuttings at the sides where you want the glued parts to part and then do some strong wiggling. More cuts to loosen them up, careful where you cut them. Luckily for mine, the seller didnt really glue them incredibly tight and i managed to pull them out without much further damage to the body parts.

2) Now for the knee joint, one of the top part of the outer hinge holding the metal rod (see pic above where you see the crack was) was broken and the seller oredi lost that broken part so i cant even just glue it back in :/ What I did was I use epoxy putty and fashion a half hinge with it. I then snuck it on to the joint and glue it in place. Remember to sand the parts you need to glue it in. See pic directly below for the result :)
3) Now you need to tackle the elbow joints. The original seller again left me with nothing to work with as the joints he threw away already. I use 8mm revoltech single joints for this case. Before I push them in, I use my drill to drill holes in his lower arm and upper arms. I use my blade to cut wedges into the lower and upper arm areas to fit the ball part of the revoltech joint into them more securedly as well as preventing his arm to appear too long. Afterwhich i fit in the revoltech joints and glue the revoltech joint to the upper arm part in place. Remember to glue the joint in a position whereby the joint can more back and forth and not sideways as a normal elbow should work.

4) Now you will notice from the pic above, the original seller also cut off some of the upper arm parts. This can be fixed again up epoxy putty. Use a small dole of epoxy putty and shape it on the broken.missing elbow parts using your toothpicks. Use the end part of your toothpick as it is flat and easy to pust the epoxy putty in place. You will eventually form the stuff into something displayed in the pic below
. See those white parts on his elbow? those are epoxy shaped as part of his elbow. Becareful where you stick the epoxy to prevent it from sticking to the parts of the joint you need it to move.

5) Once the epoxy putty has dried, mix your paint between red and black colors (I use matt Mr Color paint coz well i dont know what other paint to use ;p) into the tone similar to Ryuki's red. Color over all the white epoxy. Then use pure matt black to paint over the black color parts.


6) Let everything dry first. Now you are left with the problem of very loose joints at the knees and feet parts. Use nail polish and apply generous dose over the knee and feet joints. Let them dry.

Voila, you now have a perfectly working Ryuki :D Plus point is the revoltech joints on the elbow parts are definitely a lot stronger than ryuki's original fragile joint :) the alternative for the knee is to cut the entire original joints out and replace them with revoltech 10mm double joint but since mine wasnt that much broken, i choose to use putty instead.


Hope this is useful to all, any questions just ask away. You can use this same method to fix Blade joints as well. Thanks!