Monday, 24 March 2014

Tutorial - fast way to make SIC Banki's double guitar blade weapon :)

All right this is a very short tutorial just in case you are interested to make your own double guitar blade weapon similar to Banki's. Its not EXACTLY the same mind you but its close plus its real easy :)

First you need 2 zanki's guitars and a random chinese weapon you can buy from novelty, game or toy shops. I bought this blade below for SGD2 which is a fine deal for a full diecast blade.


Next remove one of the wings from each guitars like the photo below. You can just slot a blade below the surface of the guitar and cut away the joint connecting the wings to the guitar body. The joint itself is made of resin and hence easy to cut off. Slot the blade on the guitar like the photo below.

Recolor the whole thing into a metallic yellow color scheme like the photo below. Bear in mind not to glue or putty in the guitars and blade yet at this point.

Now to create some simple details on the guitars such as adding the putty details below:


These details are formed using tamiya quick putty which is softer when hardened compared to hardware putty. You can easily cut and form designs on them with your blade such as the cog wheel below.

Cut the aforementioned cog wheel into the design below on your guitar and blade:


Before you glue it in, paint it with super metallic silver paint. I use Mr Color paint for this.


Now use putty to extend the curve of the side of guitar like so:
This is actually a hard step to do since the guitar wings are made with metal and hence you can't drill it to add in wire support for the extension curve. Sand the wing to allow some very slight friction. Patiently form the putty around the 'tail' of the guitar wing to let the putty support itself on the metal wing.

Drill a couple of holes on the extended curve as details. On hindsight I should have remove the metal wing entirely and remade a full putty wing with an extended curve with wire support underneath the putty. This way you can properly form the putty extended curve without fear that it will break off from the metal wing.

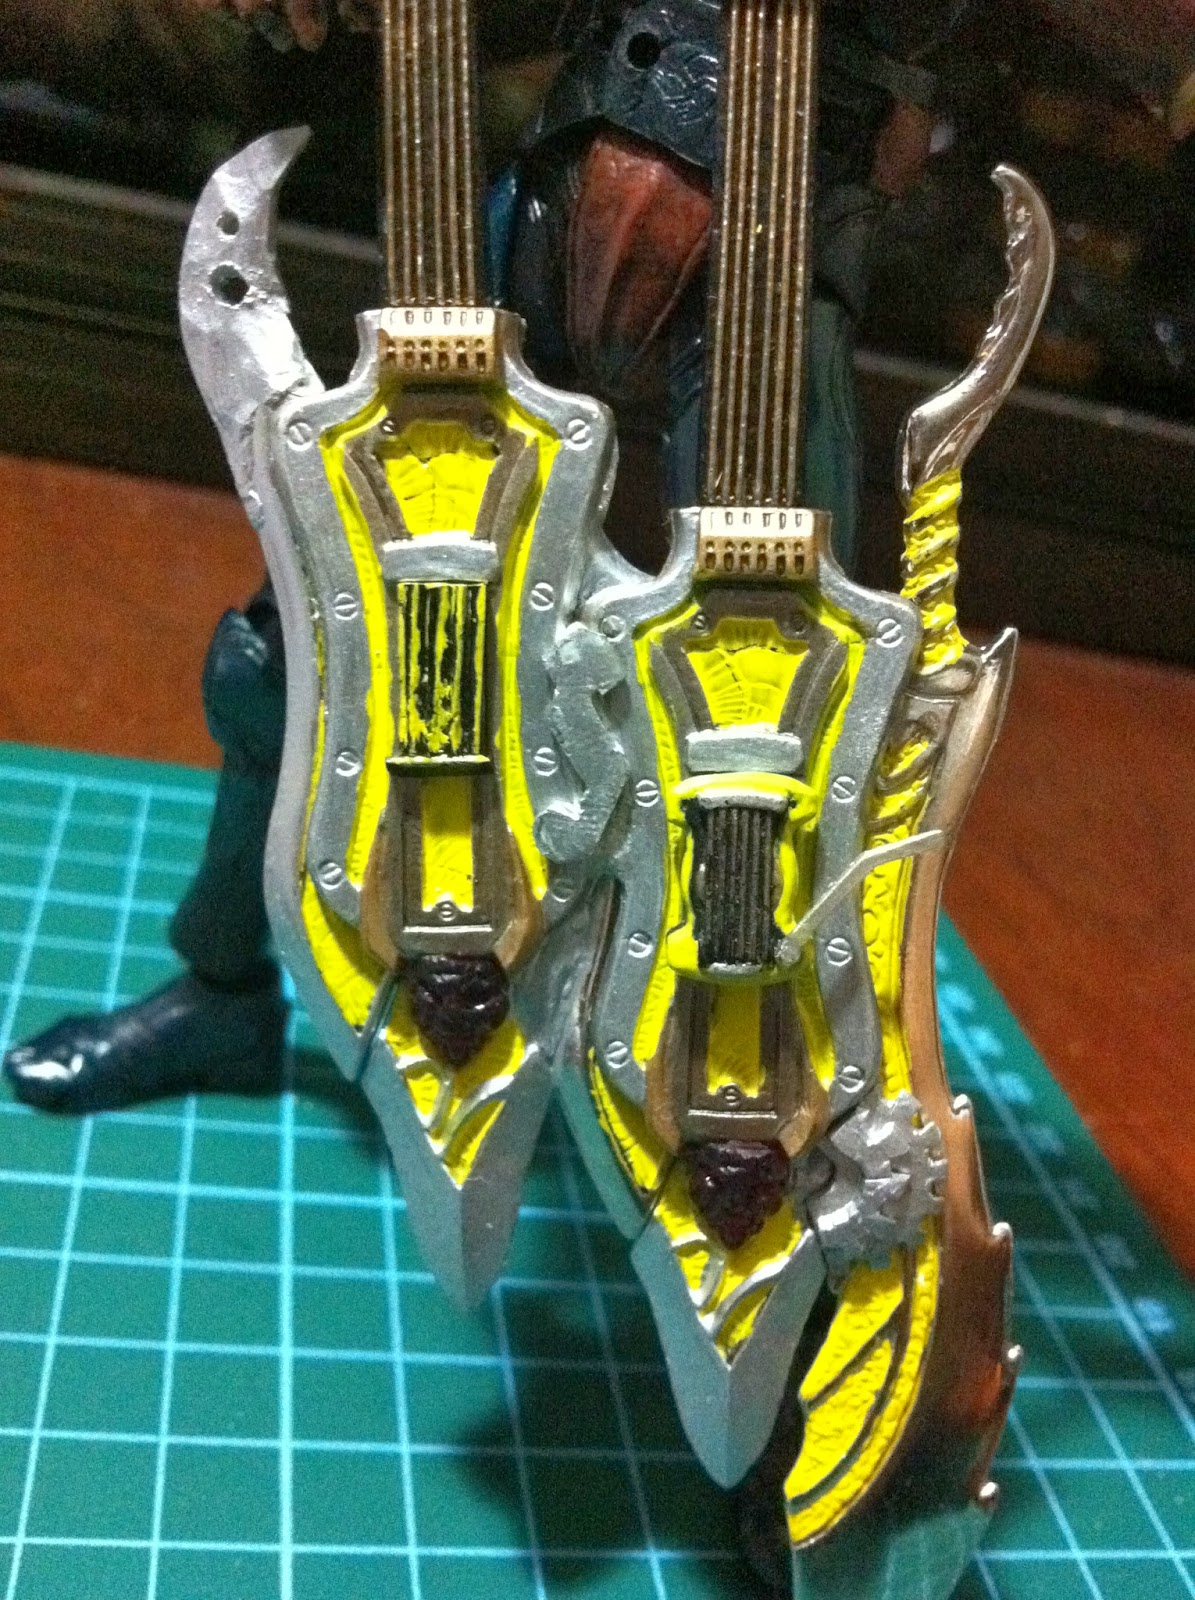
Use putty to connect the 2 guitars and the blade together. Once the putty dried, use super glue to further compound the connection. Paint the edges of the guitar with metallic silver to cover the glue and putty.

I also added a small puttysculpt and glue it in between the guita to hide the large gap between the guitars. See photo below:


And there you have it, your own Banki double guitar blade weapon :D


There are many alternatives and combination to make a guitar weapon. You can use different types of swords to connect with the guitar.

Or you can simply go crazy with the guitar weapon thingie like so:


And thats it for now ;) see you guys next time. As usual, appreciate any comments on my tutorials and if you have any questions feel free to ask ;)

Sunday, 16 March 2014

Tutorial on Custom Ohyja Survive Part 3 final

Finally the last instalment for the custom Ohyja Survive is here!

By now, you would have realied that we are actually almost done, just a little bit more touch up and that is the shoulder thorns/claws and his lengthened staff.

(5) Shoulder thorns

Before adding on putty, use metal wires (hard ones) and pierce them into Ohyja's soft chest armor as shown in the photo below. This act as skeletal frames for the putty to latch on later and it makes the sculpt harder to break later.


Now, use putty to form those thorn/claw-like sholder pads. See photo below.

To form the sharp end of those thorns/claws I have to go through 3 putty layers. The first layer just to form the rough shape of the thorns and the sculpts nearer to the shoulders. Once that layer is dried, I add another thin layer of putty to form the claws themselves. I form the claws as exact as possible and let it dry. After the putty dried, I used my blade and sand paper to make them more sharper and distinch. The 3rd layer is to form those details you see right before the claws nearer to the shoulder pads. The lined sculpts are formed by using pushing my blade on the semi-hardened putty to form lines. After the last putty layer dried, I sand the whole thing carefully.

The shoulder pads are then painted with super metallic silver and lined with a black marker.


(6) The staff

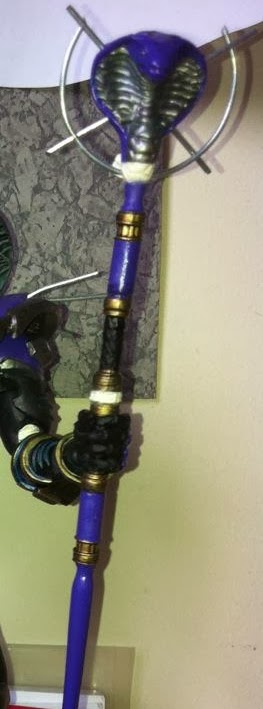
I felt Ohyja's original staff was too short and since I got 2 spare ones I thought it will be great if he has a longer staff. I also wanted the staff to be cooler so I added that ring-like sculpt around it's snake staffhead.

for the staff head, I used metal wires to form the ring-like structure. I used my handdrill and drilled tiny holes into the staff head and glue in the 4 metal wires around the staff head. I then shape a moon-like shape using another piece of metal wire and glue it onto the 4 metal wires embedded on the staff head. See photo below for what I meant. All these metal wires have been previously sanded before i glued them in. I then add a very thin layer of putty on the wires and form lines on them using my blade (see the photo after the one below). I let everything dry and then added some super glue between the metal wires and the thin putty layer to add more support so that the putty layer wont flake off the metal wires.


In order to lengthen the staff, I used the upper portion of the 1st staff and the lower portion of the 2nd staff and connect them together. How I did this is to use my handdrill and drill holes onto the surfaces where i cut off the staffs' parts. I then inserted a metal wire in those drilled holes and connect them together. I glued the parts together. To hide the connection, I used putty to form some shapes around the connection and let it dry.

Once everything dried, I added more details on the snake staff head by adding a horn and tail sculpt on the staff head. See photo below.
 
We are truly and ifnally done! The color schemes as usual are super metallic silver, brass and super metallic purple. Always paint a primer coat of metallic silver first before adding on the super metallic purple layer. Allow each l;ayer of paint to dry completely before adding the next.
 
I have also added an alternate shape for Ohjya Survive, I call it the Python Form which you can see below at his gallery. Enjoy ;)
 
I didnt mention this since its a very minor part of the custom but I repainted Ohyja's sword into purple and brass as you can see from the photo below to better suit his Survive form color scheme. Also notice from the photo below how the changes made on his staff head did not hinder the card slot gimmick behind the staff's snake head :)
 
Note the photo below on those plugs on his back that connects to the snake appendages. I used putty to shore up the cracks between the plugs and the armor. I have also extended the 'tail' end of the armor into a triangle shaped tail with putty to make it more edgy and less or a normal Ohyja form.
 
I have tried to reduce the weight of this custom by using various paddings such as rubber and soft plastics beneath putty sculpts. However, the figure will still be quite top heavy especially with the snake appendages and the putty sculpt at the front of his chest. It is very advisable if you ever make one to display him with a stand to hold him up otherwise it will strain the knee and feet joints over time.


I would have liked to position the heads on the snake appendages so that they are horizontally correct but it was hard as although the snake appendages are poseable it sometimes refuse to be positioned in the way i wanted it ;p


I must admit, adding the snake appendages on his back makes the back a mess. It was a good thing I did not attempt to stuff 6 snakes on his back instead ;p It could be done actually but the weight will be incredible and the 5th and 6th snake will be very unsupported and probably lolled about unless I remake his entire chest armor from putty or some other resin to create better support.

Notice that I used a base figure with a broken left elbow. I have replaced the broken elbow with a 8mm revoltech joint. You can check out my other tutorials on joint repairs for Ryuki series in my earlier posts.


This is the one biggest mistake I made while making this customs: Somehow made his shield too small ;p


And here is his Pyhton form, easily formed by using Mcfarlane's Medusa's lower body. I didnt made another adjustments to it but it is possible to reconnect those snakes appendages onto the Mcfarlane Medusa's lower body again by drilling holes onto the end of Mcfarlane's Medusa's snake tail and reconnect them there. I should have done it, would have made him a lot more interesting hehehe. If i did it I'll update this post with new photos of it ;)

One day when I am free and i somehow managed to get Ryuki, Ryuga and Knight sets together with these I am gonna take photos of all 6 Survive forms :D


With another year of doing customs after I made this Ohyja Survive custom, I can see where I can improve this figure with my existing skills but i doubt I will do it unless I have plenty of free time... which I never do ;p So thats it for this tutorial, hope you guys like it and as usual appreciate any comments from you. Or any questiosn you wanted to ask about the custom, I will be happy to address them. Cheerios!!


Some more photos on the work in progress stage:


Tuesday, 11 March 2014

Tutorial on Custom Ohyja Survive Part 2

I don't know why i never said this before but I'll like to say to all my viewers: thank you very much for your support so far. I have daily hits of 50 and above these days and a lot more on days when i post new stuff up but hardly anyone commented on anything.

Although I get zero advertisement money since Adsense disapprove of my blog for some immutable reason which they refuse to divulge, I am still happy that many people see my blog as a sort-of good source for SIC customs :D If you guys wanted to post more comments on my pages would be really helpful to keep my motivation up! thanks again, guys!

And without further ado, here's Part 2 of the tutorial for Ohyja Survive custom. Bear in mind I am not following the Hero Saga's version though as I feel its not a Final form enough design so I supped it up with Mcfarlane's Medusa figure parts plus some enhancement of my own on his staff. Feel free to make your own modifications that will further make this figure a work of art :D


For this part of the tutorial, we will deal with his Shield and his Snake Appendages on his back. As the time I did this custom I was really not good at creating tutorials, I have not taken photos of some of the steps that should be taken but I will try to describe them in words as accurate and detailed as possible.
 
(3) Shield
 
For the shield, I used one of Ohyja's arm pads as the base. First I sand the metal arm pad to give the putty a little more hold on it. I then used epoxy putty to form a large base on the arm pad for later additional putty layers. I stick some metal wires to form support for later add ons, see photo below.


Once the putties has dried, I add on the top part of Ohyja's head which i have cut off earlier as a base for the shield, see photo below.


Then I start forming the actual shape of the shield's snake head and tail. Notice how the metal wires form support for the tail portion? I didn't take photo of a step whereby i stick small metal wires on the putty snake head where the fans are suppose to be before the putty dries. Once the snake head putty dried, I add putty fangs over the metal wires. The metal wires again act as support and prevent breakages in case the shield falls off.

Next, I started adding details to the snake head by forming nose, forehead and eyes. All these are done using my blade. First Add on pieces of putty on the snake head. Let it dry for 45 minutes before cutting the putty into the shapes you wanted. Its easier to cut the putty without your cuttings moving the putty about if you let the putty dry and harden at least for 45 minutes first. The time required for the hardening (not full hardening but partial) depends on what putty you uses. Some putties such as Tamiya's Quick Type dries faster).

I then add 'scales' over the shield's body, see photo below. The same technique described at the paragraph above applies.


And finally here is how it looks after completing the body and head of the shield. Those minute holes you see on the 'scales' are done by poking holes on the sides of the 'scales' with my pimple needle when the putty are half dried. the miniscule rectangle design you see on the snake head forehead is done with toothpick. I shave the head of the toothpick to form a small rectangle head instead of a sharp needle head.

Again due to my inexperience in designing tutorials i forgot to take a photo of the next step. really sorry about this. What I did next was to create the tail of the shield. I used a small plastic sheet cut it up in the shape of a tail and glue it on the putty and metal wire support already added onto the shield. This plastic sheet act as a base for me to add putty on top of it. Using the plastic sheet as base plus putty as compared to pure putty sculpt makes the tail stronger to prevent breakages yet slim enough to make it look good. I then form shapes on the tail using my toothpick and my blade.

I then add more details to the body by adding that gold trim design on it. That design was done using small thin plastic sheets glued onto the shield.

I also added some wheel designs on the underside of the shield. You can partially see this in the gallery part in part 3 of this tutorial.

Final thing to do is of course to paint the shield. Sanding is a must.

Color them are as follows:
1) Super Metallic Purple for the shield body
2) Metallic silver for the sides
3) Brass for the gold trims and eyes and
4) Use a liner pen to make black linins on the designs of the shield.

On hindsight, I should have made the shield larger ;p This serves a warning to all amatuer customisers. Sometimes you can get really too 'into' the custom creation itself you miss the big picture, literally for this case. I was so into how to create the shield shape and design i completely forgotten that it is a shield and not an ornament. It should be large imposing and usable ;p oh well next time perhaps.


(4) Snake Appendages.

Ok here are the steps, some of which are very crucial to follow in order to make the snake appendages structure to last. This means you need to build support on the Ohyja body itself so that if you hang those snakes on his body for prolonged period of time, the snakes won't start slouching, falling off or sloping to unwanted directions.

The way to achieve the above is to provide strong support from the body, not from the armor since the armor is made of soft rubber and wont hold nuts not to mention those snakes are quite long and heavy.

Again my apologies for not taking certain photos that explains what i did. I will try to describe them in words for you.

The first thing to do is to drill holes at the base of each snake appendages (see photo below on the part highlighted in red). I used 4 in total, feel free to use as many as you want but to me 4 is enough to avoid cluttering everything up and make it more fragile at Ohyja's back.

I got some unwanted leftover sprues from gundam kits that I used to make the connecting rods for the snakes to the Ohyja body. I cut off 4 rods from the sprues and glue them onto the drilled holes on the base of each snake appendages. Make sure the rods are long enough e.g. about 5 cm long. I let about 2 cm length of the rods to be embedded inside the snake appendages and glued them in, leaving 3 cm of those rods poking out of the snake appendages. Thse rods will then be connected to Ohyja's body via the holes i will drill. See below on how this is done.


Next,  we move onto Ohyja's body armors. Cut off those connector ports found on the back of Ohyja's armor. Since I got 2 spare armors, I get 4 ports (you can always replicate extra ports using putty with oyumaru resin, see my older tutorials on how to use oyumaru resins). I glued these ports onto the Ohyja's back like in the photo below:

I then drilled holes into the middle of each ports. These holes will act as conduit for the snakes to be connected to the body.

Now, as I have mentioned the Ohyja armor is soft rubber and can't support anything at all. So what needs to be done is to create support for the snake appendages using Ohyja's base body itself. I drilled holes on the exact same spot where the holes of Ohyja's armor are. I then glue the back of Ohyja's armor to the base body to prevent the holes from moving about thus unable to connect fully with the snake appendages. The 3cm rods poking out of the snake appendages are then pushed into the holes on Ohyja's armor and further into the holes on Ohyja's base body. Ohyja's base body are hard resin and are able to support those snake appendages. The added side benefit is that the snakes when conected to the body makes Ohjya's armor more secured and doesnt move about much. Note that the above can only be done with the two snake appendages connecting to the lower part of Ohyja's armor. the 2 snake appendages on the higher and outer part of Ohyja's armor will have no such support. However, thanks to the 2 lower snake appendages creating support for the Ohyja's armor itself, the upper 2 snake appendags when connected to the Ohyja armor became quite stable. To make it more stable, I glued 2 pieces of thicker plastic sheets with hole in the middle of each sheets beneath the Ohyja's armor to provide support for the rods on the snake appendages.

The result from the above modification are 4 snake appendages growing out of Ohjya's back to add to his poisonous arsenal! Each of the snakes are poseable and they can turn 360degree on Ohyja's body.

For color scheme, I used metallic silver as a base coat first. Then once the metallic silver layer dried i add on a super metallic purple layer on the snakes and brass on those collars on he snakes.  As usual, I used Mr Color paint for my customs. For the snake appendages, I drybrushed most of the metallic purple on them to avoid painting over the black/grey paint on the areas between the scales.


I would have love to have all 4 snake appendages to be pythons but unfortunately the Mcfarlane medusa only comes with 1 python head and the rest are regular snake heads ;p oh well

Stay tune for the final part of the tutorial and photo gallery next week ;D see ya!

Tuesday, 4 March 2014

Tutorial on Custom Ohjya Survive Part 1

Here is a tutorial of one of my earlier custom: Ohyja Survive!! :D

I didnt really like Ohyja Survive's design back when i first saw it in hero saga, i am somewhat dislike its purple scheme and i dont like snakes ;p

However, 2 things changed my mind: (1) i have finished my customd Taiga Survive and Zolda Survive and a 3rd Survive custom is in order and (2) I found a Mcfarlane's Snake woman toy figure for a cheap price of SGD15. It has a real nice sculpt and so full of those useful chains and snake appendages. Thats when i know how my own version of Ohjya survive will look like :D

The custom steps itself are pretty simple though tedious, and here they are:

First lets summarise the parts you need to resculpt/custom:
1) His head
2) His chest
3) His staff
4) His back (with snakes implant)
5) His shield
6) Shoulder thorns
I will be covering part (1) and (2) in this tutorial.

And here are the materials you will need:
1) An Ohyja figure
2) Spare Ohyja chest 2 sets (using 2 sets are actually optional but helps since it reduces sculptings, you can always use one and that works too just more putty required)
3) 2 sets of Ohyja's staff (no harm if you can't find two, just that you will either need to sculpt out the staff into a longer piece or don't change it at all)
4) Knight Survive lower legs and lower arms
5) Macfarlane Snake monster woman figure (see photo below ont the parts i needed, mainly the snake appendages, the head. Ignore that Metal Gear piece in the same photo which i ultimately didnt use)
6) A revoltech 8mm single joint (several if your ouja figures have elbow breakages ;p pls refer to my other tutorial on broken ryuki joints repairs) (you can buy these from hlj website :D)
7) Your tools: epoxy putty, toothpicks, blade, some small pieces of plastic sheets, metal wires, super glue, sandpaper, thinner, some brushes and of course Mr Color paint :D)


Without further ado, please see below for the tutorial :D

1) His head.

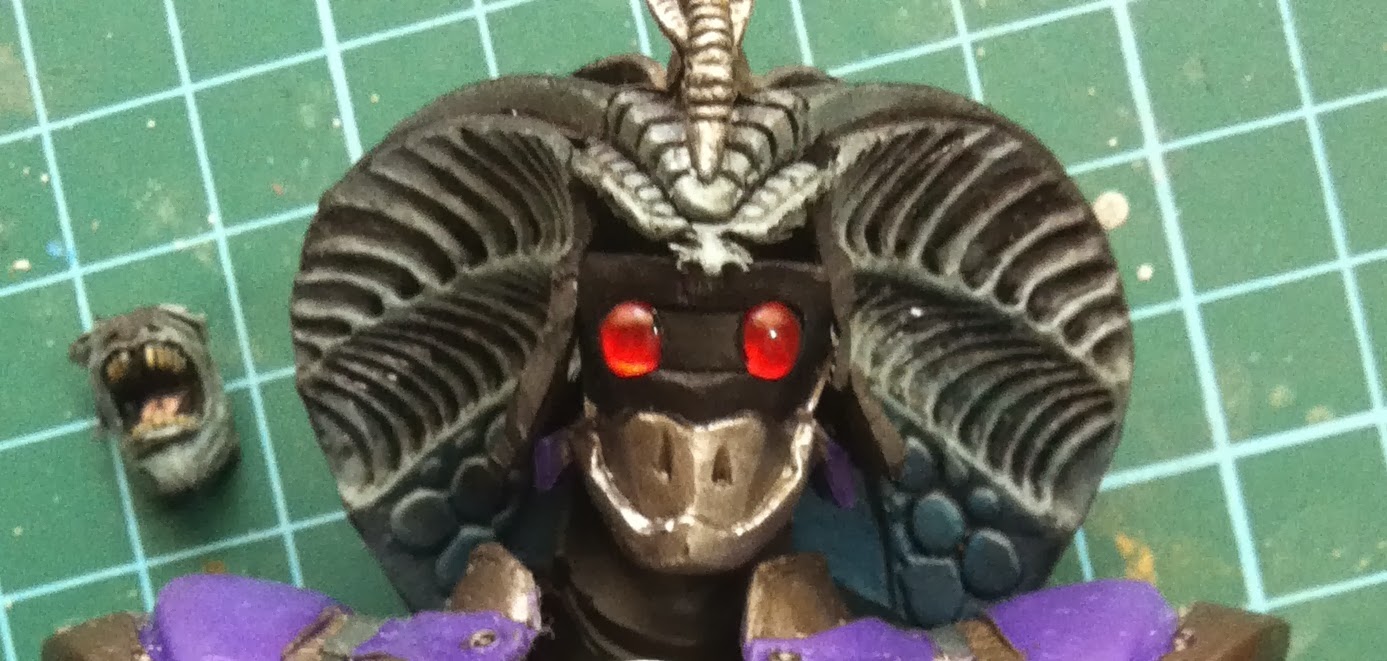
I didnt follow Hero Saga's Ohyja head version as i wanted his head to look more like a snake's.

So I cut off Snake woman's head and hollow out his face and stuff with my blade until all that was left was a snake-looking headdress. I then test it out on Ohyja's head. Note, I have removed Ohyja's eye mask revealing 2 translucent red orbs underneath. Cool. they will be useful. So I cut them off for later use ;p


Next, I start cutting up Ohyja's head. Those vent like designs near his ears are cut off to be used as designs for his headress later. The top of Ohyja's head will be used as part of Ohyja Survive's shield (see next part of the tutorial)

Each time i cut Outja's head out, I measure it with Ohyja's head piece and Ouja's neck piece to make sure I dont over do it or leave too little materials on Ohyja's head that i can't connect to Ohyja's neck properly later. Once Ohyja's head has been properly cut down to size, I don the Snake Queen's headress on Ohyja's head and glue them together. Next I used epoxy putty to fill in the gaps between the head dress and Ohyja's head. See photo below.


Next I replace Ohyja's eye mask on the head and those vent-like designs i cut off from Ohyja's head and glue them on like the photo below. I also started adding more sculpts on the head such as a crest like detail over his eye mask.

that small snake design found on the Queen Snake's headress was just too backwards to make it work so i cut that piece off and glue it further upfront on Ohyja's head (see photo above). I filled the gap between the headdress and that small snake design piece with putty (see photo below).

Since the headress' tail part  made the head's movement very restrictive (plus it hinders the snake appendages that I wanted to place on the back of his body later), I cut off the lower part of the tail as pictured in the photo below. I then drilled 2 holes, one in the middle of each of the cut off surface of the headdress. I used a revoltech 8mm single joint piece to connect the 2 headdress piece together. Thsi way the lower snake tail part of the headdress are able to move independently no matter which side the Ohyja's head turns. Helps a lot to allow more poseability for the head without being blocked by the snake appendages on Ohyja's back.


After everything's done and the putty has dried, use sand paper to sand as much of the surface as possible before painting them.

For the painting part, back then I didnt know what the heck is a primer so i didnt use one ;p What I did was I used the following colors for the following parts:
1) Super metallic purple for the headdress
2) Brass for the crest and small snake
3) Metallic silver and white for the top of head and mask\
4) Matt black to cover up other parts behind the headdress that doesnt follow the purple/silver/black theme of Ohyja's

Annnnd thats it for the head.


2) The Chest piece

I used 2 Ohyja chest piece to make this since I have a spare. Makes it easier so that i don't need to use putty to cover up the gap and make the figure too heavy.

First cut up the part highlighted in red i the photo below. For Piece A, cut the front of the chest piece out. For Piece B made cuttings along the red line The remaining front part of the chest for Piece B are to be removed and throw away.


Once that is done, glue the cut off front chest piece fron Piece A on the front of Piece B making the chest of Piece B to buldge out (see couple of photos below to know what I mean).

Use some light materials like rubber or the unneeded piece of Piece B as paddings and glue them on the middle front of the chest piece. Next, add putty over the paddings like the photo below. I used a pen to mark out how I want the design to look like on the putty for my next few layers of putty sculpt.


Now the next part involve a few layers of putty to be added on top of one another AFTER each layer has dried.

First add a thin layer of putty on the middle of the chest piece to form the mouth plate. Let the putty dry for about 1 hour plus. Use your blade and start cutting lines on the putty layer and then pluck out each of those line putties to form a grill-like design (see photo below). When the putty has dried sufficiently but not hardened fully, it is easy to cut shapes on the putty using your blade without causing the putty to go out of shape.

Next add a top layer over it to form the top part of the chest piece. Form 2 putty balls and put it on the part where the eyes are suppose to be. Remember those translucent red eyes i cut from Ohyja's head? Push these red eyes on top of the putty balls like the photo below. If you position it right, the putty ball will form a circle around the red eyes.


Before the upper layer of putty dries, use yourtoothpicks to form details on it like the photo below:

Notice I have a spare red eye that I add on the forehead of the chest piece as a design.

Now once everything dried. It is time to form the parts around the middle of the chest piece. Use putty to form up his abdomen's sides (see photo below).

For the fangs of the chest piece, I used 2 small pieces of plastic sheet and glue them on the top part of the putty layer and then add some putty over the plastic sheets, see photo below. This is actually a very bad way to form those fangs but I was young and unseasoned so yea. The better way to do this is before the upper layer of putty dries, stick 2 piece of wires on the part where the fangsare suppose to be. Let everything dry. Add super glue on the wires to make sure they stay in place. Once the superglue dried, add putty over the wires to form the fangs. This way the fangs are easier to be sculpted on and you wont afraid of future breakages if the figure call on his chest.

One more detail to work on the chest piece is to form those 'wedges' that sticks out from either side of Ohyja's 'breasts'. I cut slits into the sides of the 'breasts'. Then I stick and glue in 2 pieces of plastic sheets to form the 'wedges' and then add putty over it. Voila, see photo below ( i didnt have a pre-painted photo of those wedges so a post-painted photo will just have to do).


Now once everything has dried, use sandpaper to sand everything (except the fangs or you will break them off ;p).

Add on the following color themes:
1) Super Metallic Purple on the overall chest piece.
2) Metallic silver over the grilled mask and other parts of the chest (see photo above).
3) Brass over the linings (see photo above again)

Aaannnd we are done with the chest. See the photos below:

Remember to cover the whole body with a topcoat.

Next Part coming up in a week or so ;D