MERRY CHRISTMAS EVERYONE!! :D
sorry too busy lately to post anything ;p

Thursday, 25 December 2014
Sunday, 30 November 2014
My new kiwami shelf :D
 Nope absolutely no time to make any customs lately due to workload. Its being really pressurizing at work yet exhilarating at the same time! So yea, no customs yet ;p
In the meantime, I cleared one of my detolf space and decided to just display some of my kiwami customs on it instead. Compared to regular SIC, kiwamis are way smaller and this creates a lot of space on the shelf which brings out the incredible details of each individual kiwamis. Now if only I can have more shelfs to display my normal SIC in this way instead of the clutter they are in now ;p
Hope you enjoy the pics :) see ya!
I still have a custom agito flame and storm form, a hibiki todoroki custom and a couple of other kiwami customs somewhere ;p can't find them to fit into the shelf but turned out that's a good thing. The empty spaces in between the kiwamis brings out their details even more.

Bought a couple of those small bikes which I thought fit the riders really well especially the Sons of Anarchy bike for Nega Den O.

You must be wondering how Den O Wing form stands without a stand propping him up what with his heavy full putty created wings. What you can't see are blue tags stuck behind his wings and attached to the detolf cabinet itself holing the figure up. He is practically in a semi floating position actually.


Mine you, I didn't butcher a faiz accel form to make this. I replicated accel's form chest and replaced blaster form's chest with it. The best thing about this custom is that blaster's original chest can still be closed over the accel chest :)

My latest kiwami custom todate, Zeronos Vega Form stand as one of my better kiwami custom. However, if you would read the tutorial for making this guy you will realise he isn't all that hard to make so long you have a Motion Revive Series figure and some oyumaru resin handy ;) His giant sword is actually the mini sword accessory found in the regular SIC zeronos set attached to a few of the kiwami version of his belt buckle items.


Back then I was fuming that a Kiwami Nega Den O costs S$50! I thought that was really way expensive for a small figure! So one day I managed to find a loose Den O figure and made this guy. Need incredibly steady hands and a very small brush for all those tribal tattoos of his. Maybe I should add a couple of wings on him too to form Nega Den O Wing Form. Now THAT's an idea.


Wednesday, 12 November 2014
Custom SIC Shin Shocker Rider the Next
I couldn't help it, I had to make this custom but I was lazy to do it in a more detailed version (resculpting the entire chest and ab piece like the Chinese dude who did this) so here is the washed down version that I believe ANYONE can make one :D

Here are the simple but tedious steps:
1) Pull out the chest piece from the body
2) Pry and pull out the abs piece from the stomach area (its secured by joint and some glue so you gotta pry it out hard. Just dont deform the piece too much from the prying)
3) Sand the lower legs, lower arms, the head and the scarf for repaint later
The Head
4) Use paint remover or thinner to remove the red tint on his eyes. Recolor it clear green
5) Repaint the head with (1) metallic silver layer. (2) metallic green layer, and a wash of clear green on certain areas (those which are more 'sunken' than the other areas).
6) Do panel linings
7) Repaint the antennas with a mixture of clear yellow, clear orange and clear red
8) Touch up any oer lapping paint
The Chest piece and the abs piece
1) Remove the paint on the front and back of the chestpiece with paint remover or thinner. This is going to take a while you need to remove the paint at the front of the chest very thoroughly.
2) Next paint a layer of metallic yellow paint at the back of the chest piece.
3) Paint the following layers at the front of the chest piece: (1) clear yellow (2) clear orange at the sides and certain lines and then (3) clear red (diluted) on the edges of the chest peice and certain linings near the edges. Make sure you let each layer dry completely before adding the next!
4) Reconnect the pieces onto the body. For the abs piece, if you didn't deform it too badly, it will easily fit back onto the connecting holes on the body.


The lower arms and legs:
1) Paint the following layers: (1) gloss yellow, (2) gold or brass, (3) clear yellow wash,
2) Do panel linings
3) Continue with a few more paint layers: (4) clear orange on edges, grooves and indents, (5) clear red on very deep groves and edges
4) Touch up on overlapping paint which will mostly be over the matt black areas or the hand joint areas


The scarf:
1) Just paint a layer of clear red over it to make it shine better
The belt:
1) Paint a clear red layer over the red parts
2) Do better panel linings on his belt buckle
Aaaannnndd we're done :) Sounds easy enough? It is BUT extremely tedious. The result will be as follows, enjoy the photo gallery :)


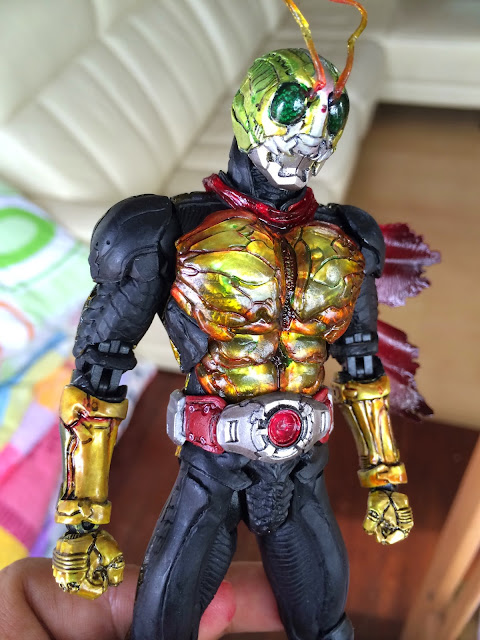
Here are some photos of the original shin ichigo figure and the customed shin shocker for your viewing pleasure :)


Here are the simple but tedious steps:
1) Pull out the chest piece from the body
2) Pry and pull out the abs piece from the stomach area (its secured by joint and some glue so you gotta pry it out hard. Just dont deform the piece too much from the prying)
3) Sand the lower legs, lower arms, the head and the scarf for repaint later
The Head
4) Use paint remover or thinner to remove the red tint on his eyes. Recolor it clear green
5) Repaint the head with (1) metallic silver layer. (2) metallic green layer, and a wash of clear green on certain areas (those which are more 'sunken' than the other areas).
6) Do panel linings
7) Repaint the antennas with a mixture of clear yellow, clear orange and clear red
8) Touch up any oer lapping paint
The Chest piece and the abs piece
1) Remove the paint on the front and back of the chestpiece with paint remover or thinner. This is going to take a while you need to remove the paint at the front of the chest very thoroughly.
2) Next paint a layer of metallic yellow paint at the back of the chest piece.
3) Paint the following layers at the front of the chest piece: (1) clear yellow (2) clear orange at the sides and certain lines and then (3) clear red (diluted) on the edges of the chest peice and certain linings near the edges. Make sure you let each layer dry completely before adding the next!
4) Reconnect the pieces onto the body. For the abs piece, if you didn't deform it too badly, it will easily fit back onto the connecting holes on the body.


The lower arms and legs:
1) Paint the following layers: (1) gloss yellow, (2) gold or brass, (3) clear yellow wash,
2) Do panel linings
3) Continue with a few more paint layers: (4) clear orange on edges, grooves and indents, (5) clear red on very deep groves and edges
4) Touch up on overlapping paint which will mostly be over the matt black areas or the hand joint areas


The scarf:
1) Just paint a layer of clear red over it to make it shine better
The belt:
1) Paint a clear red layer over the red parts
2) Do better panel linings on his belt buckle
Aaaannnndd we're done :) Sounds easy enough? It is BUT extremely tedious. The result will be as follows, enjoy the photo gallery :)


Here are some photos of the original shin ichigo figure and the customed shin shocker for your viewing pleasure :)


Sunday, 2 November 2014
Custom Weathered Jetslinger

Here's a short tutorial (more like a list of tips) in doing weathering. Point in case this time: a Jetslinger weathering custom.
First thing first, in order to allow a SIC figure to sit on this thing, you have to remove those plastic connectors on his seat. USe a handsaw to cut them off like so:

Now your SIC Faiz can sit nicely on the bike.

Now then. there are a lot of ways to weather a bike and you can find all sorts of tutorials on the net teaching you how to do it. I'll share some of them in summary over here for you:
Weathering is all about showing stains, wear and tear, rust and erosions. To achieve this, you have to:
1) Dry brush opposing colors over the surfaces
2) Certain areas, you may consider sanding it to remove the colors to show erosion or wear. Sometimes you can paint two layers of colors on a surface and then sand the first layer off on certain areas to show wear. Add some rust brown paint over the areas where the two colors meet and you have rust
3) Dry brush over edges, lines, corners etc. This brings out the weathering effect
4) You want burnt effect on exhausts? Dip our brush over a heavily thinner-ed heavily paint filled matt black pool and then wipe over the edge of the exhaust leaving small pools of thinner filled matt black paint over the edges. These will dry off to look like the exhaust end has seen some heavy fiery discharges
5) Do linings over lines, edges etc. Panel liners can also be used to create shadows. Dip your tip on the panel liner ink pot heavily let the tip soak up some of those diluted paint and then splash them over corners to create shadows or wear.
6) Metallic silver are a nice color to use for weathering especially over black surfaces. Use this color to your advantage, you can even paint it over tyres and other areas that consist of different colors. Most of the time, you drybrush it voer the surface.
Well that's about all I can remember about the techniques I used to make this weathered Jetslinger. Hope it helps. Enjoy the photo gallery :)


The set of photos below will show you the difference between a weathered version and anoriginal version of the jetslinger :) I did this commission for a friend. One day I will make a SIC weathered version, complete with a lot more added details, weapons, vanes etc :)


Subscribe to:
Comments (Atom)